SMS-MMS-FREE.RU, SMS FRI SMS, send MMS from a computer to the phone, Balance of Tele2 Call2friends, download films, TV shows, music, VNC, how to find out the owner of the number, which operator belongs to the number of the cell phone, does not turn on what to do, The sound is interrupted into the bluetooth bluethee Blutuz, the bluetooth headphones, free calls in Russian, transfer contacts, cleanse, free memory on the Huai, Samsung tablet, Samsung Diamond Washing Machine KG error codes, operating instructions
How to disperse a video card. Free programs for overclocking and testing NVIDIA GeForce.

Today we consider the simplest and most effective way to disperse the NVIDIA video card. To increase the performance of the chip, the well -known NVIDIA Inspector program and several more free programs for determining the video accelerator parameters and a visual assessment of its work will be used.
Before proceeding with the acceleration of the video card, it is necessary to warn readers about the risks of this case. To increase the distribution of the device, it will be necessary to increase the frequency of the processor and memory of the video card, and this leads to an increase in the heating of the components of the computer system of their overheating and the possible failure of them. It also must be borne in mind that electricity consumption will be increased and the PC power supply may not pull the increased load.
Why accelerate the video card?
In what cases is it profitable to overcome the video accelerator. If you have an outdated video card, and some computer games or programs do not start on it, then increasing performance by 10-20%, they can earn. So you can save money on buying a new computer or video card.
And if everything works so well, games are launched, 3D applications work, then there is no meaning in the dispersal of a graphic adapter with appropriate risks, there is no sense.
Next, we consider the method of dispersing the video devices of NVIDIA. If you have a graphic adapter from ATI (Radeon), then the logic of acceleration actions will be the same, but another Soft, software will be used there, information about which you need to look for on sites on the Internet.
How does the video card accelerate?
To disperse the video card, it is necessary to increase the frequency of operation of the system companies, namely:
– the frequency of the graphic nucleus;
– memory frequency;
– frequency of shader blocks;
– increase the adapter voltage.
GeForce video card instructions
Before starting, it is necessary to determine at what frequencies at a given time a graphic adapter works. This can be done using a convenient and free GPU-Z program.
The latest version of GPU-Z can be downloaded from the official website of the developer or from our site at this link.
Download and install the program. After starting, the GPU-Z utility will show these works of your video accelerator.
We are interested in information about the frequency of the graphic nucleus (GPU CLOCK), the frequency of shader blocks (shader), the memory frequency of the video card (Memory).
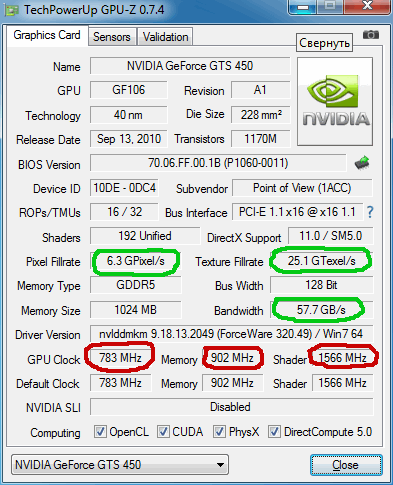
GPU-Z screenshot of the program.
In the picture, the performance parameters are highlighted in green. In red, the frequency of the device that needs to be increased. It is necessary to increase the frequency by 10-15% no more. Otherwise, the risk of overheating of the video card and its failure will be high.
To change the frequency of the GPU Clock, Shader and Memory, we will use the free nVidia Inspektor program. Which can be downloaded for free from the official website of the developer or via a link from our website: download nVidia Inspektor.
This program does not require installation. Download the program archive, unpack it and run the nvidiaInspector.exe file.
Once launched in a new window, click the Show Overclocking button, then click Yes.
You should see a window with sliders and buttons for overclocking your nVidia graphics card.

Screenshot of the nVidia Inspektor program.
In the right part of the program, first we will raise the value of the core clock (GPU Clock) and the frequency of the shader units (Shader Clock) will automatically rise, because. these parameters are interconnected.
It is necessary to increase the Shader Clock frequency by no more than 15% of the initial, working frequency of the processor, for this we move the slider to the right.
For the changes to take effect, you must confirm them by clicking the Apply ClockVoltage button.
Testing a new video card operation mode.
Next, you need to make sure that the video card is working correctly and stable. To test the video image, we will use the free FurMark utility. This program loads the video accelerator with work and displays a test video clip on the screen, by which you can determine the smoothness of rendering small details, the frequency of changing the picture, the temperature of the processor of the graphics adapter, its frequency and voltage.
You can download the FurMark utility for free from the official website of the developer or follow the link from our website: download FurMark.
Download, install and run FurMark. Next, press the BURN-IN test button and watch the video – a rotating object. If within one or several minutes there are no jumps, distortions, jamming and other similar phenomena on the images, then the video accelerator performance test at a new, increased frequency has been successfully passed.
Now you can proceed to the next stage of overclocking the video card – increasing the frequency of the device's memory.
Video card temperature control.
Even in the FurMark program, it is possible to control the temperature of the heating of the video card. The application interface shows a graph of the current processor temperature. Its temperature should not exceed 90 degrees C. If it exceeds this limit, then actions must be taken to enhance the cooling of all components of the system unit and the video card as well. This may require cleaning the case and cooling fans from dust. Or installing an additional or more powerful cooler on the computer case, main processor or graphics accelerator.
Or if there are problems, take a step back. End the test by pressing the Escape button.Right -click on Auto load – Open – copy the settings file from Nvidia Inspektor there.
For Windows 8 and Windows 10 there will be a different way. Explorer – Disk C – User folder – Appdata – Roaming – Microsoft – Windows – Start Menu – Programs – Startup. For example, for the SASHA user, the address in the conductor or in Total Commander will be: C: \ Users \ Sasha \ Appdata \ Roaming \ Microsoft \ Windows \ Start Menu \ Programs \ Startup.
But the fact is that the Appdata folder is hidden and it will not be visible in Windows conductor. Therefore, the easiest way to go to the Automobile Automobile folder through the Windows console.
To do this, click on the keyboard the Win+R buttons and in the window that appears called Perform, write the Shell: Startup command and click OK. After that, the Automobile folder will open, into which you need to copy the video card settings generated by the NVIDIA Inspektor utility.
Temperature control.
An overclocking device increases the temperature of the entire computer system unit. Therefore, at first it is necessary to control the data from temperature sensors not only of the video card, both of the system board and the main processor. It is most convenient to do this using a free Speedfan program.
This program not only displays the temperatures of all sensors of the system unit: processor, memory, graphic accelerator, hard drive, motherboard chipset, but also allows you to configure the operating mode of the cooling system.
You can download Speedfan from from the official website of the developer or by this link from our site: download Speedfan. lang=en style=height: 28px;Return to the NVIDIA Inspektor program. Reduce the frequency of Shader Clock and repeat the test in Furmark.
Improving the frequency of RAM.
After the stable state of the system is found, you can increase the frequency of operation of the video card.
To do this, in the NVIDIA Inspektor program, we move the Memory Clock slider to the right, changing the frequency of memory by about 15%. We confirm this action by the Apply Clock Voltage button.
We test NVIDIA in the Furmark application. If everything is fine, then the final stage follows.
Improving the voltage of the NVIDIA video card.
Raise the voltage of the video card to one item. For this, in the NVIDIA Inspektor program, we move the Voltage slider to the right one step. And click Apply Clock Voltage.
The NVIDIA Inspektor utility allows you to save the settings for overclocking the video card to a separate file. Since after rebooting Windows, all settings will be reset to the original, workers, standard ones. Then in order to return to the new one, just start the settings file made in Nvidia Inspektor.
To make such a file and save it on a computer hard drive, in Nvidia Inspektor, click the Creat Clocks Chortcut button. The file with the settings of the graphic adapter will be created on the Windows desktop.
Now when you need to disperse the video card, just start this file.
Setting up the automatic mode of acceleration of the video accelerator.
To launch a video accelerator video accelerator in automatic mode, after turning on the computer, it must be added to the Windows Automobile folder.
Video: Acceleration of the NVIDIA video card.
Video: how to safely disperse video cards.
You can do this for Windows XP, Vista, 7 along the following path: Start – Right -click on Auto load – Open – copy the settings file from Nvidia Inspektor there.
For Windows 8 and Windows 10 there will be a different way. Explorer – Disk C – User folder – Appdata – Roaming – Microsoft – Windows – Start Menu – Programs – Startup. For example, for the SASHA user, the address in the conductor or in Total Commander will be: C: \ Users \ Sasha \ Appdata \ Roaming \ Microsoft \ Windows \ Start Menu \ Programs \ Startup.
But the fact is that the Appdata folder is hidden and it will not be visible in Windows conductor. Therefore, the easiest way to go to the Automobile Automobile folder through the Windows console.